Labels

Tuesday, October 18, 2016

African Tribal Dancers

I found this wonderful lesson plan on Deep Space Sparkle. Sure, you can still create this lesson with no problem, but if you purchase it on Deep Space Sparkle then it provides you with time saving worksheets that I found to be worth every penny! I have no affiliation with Deep Space Sparkle... I just love this lesson!
Day 1: I started the lesson showing the students a SmartBoard lesson on Matisse. We looked at his collages and specifically looked at Two Dancers.
We also learned about Africa and the African culture. I always have 5th grade make an African mask, so this is a great lesson to ease them into Africa. I had the students pick a background color and another color to be cut up into lines and shapes. Remind the student that the emphasis should be your dancer, not a busy background. Keep it simple!
Day 2: The goal for the students is to create a collage of an African tribal dancer that shows movement. I had the students use the template guide provided in the lesson. Like I said before, the lesson plan provides worksheets and other examples that helped give my students different ideas on dance poses, clothing, hair, and accessories. There is even a template for the body parts of the dancer. I love that every project turned out differently from one another and it displayed beautifully in the hallway. The students really got into this lesson and not only did they learn about Matisse and Africa, but they learned about composition, emphasis, movement and shapes.

Saturday, October 8, 2011

Dia De Los Muertos


To start the new school year off I decided to have them make a project to celebrate Dia De Los Muertos (Day of the Dead). It is a Mexican holiday that takes place on Nov. 1st and 2nd to celebrate the lives of friends and family members who have passed away. Perfect project to have hanging in the halls during Oct. and Nov. The decorations used during Day of the Dead are full of color, pattern and design.

We first folded our paper then drew half of our skull and cut that out. We focused on The Elements of Art to produce the line design on our skull. The key is to have a balanced composition... Not too much and not too little. I stress to the kids to have clean and organized thoughts on paper. No scribble scrabble! Trace with a thin sharpie then color in with thin crayola makers.

We used a colorful background paper then traced the length of a ruler on all 4 sides to create a nice border. The border is painted with bright, bold fluerscent paint. Glitter is then added to the borders for a touch of sparkle. We glued the skull in the center of the background paper and our beautiful Day of the Dead skulls are finished!


Thursday, July 8, 2010

Georgia O'Keeffe Flowers


I have always done this project with my second graders and I have had much success with it. It's a great art history lesson and really starts to get the kids to think about color theory. What works, what doesn't work. I am very lucky to have a SmartBoard in my classroom and I do have this lesson on SmartBoard form if interested. In furture posts, I will talk more about the SmartBoard and how it can change your way of teaching forever. It's time everyone gets into the 21st century and having a SmartBoard is a great way to do it.

Materials:
*9x12 White drawing paper
*Pencils
*Sharpies
*Oil Pastels- I have tried many brands of oil pastels and the one that works and blends the best is crayola.
* Watercolor Paint- warm and cool colors

The students will study Georgia O'Keeffe and understand how she broke down the barrier for women artists. She was popular for her large abstract flower paintings and this will be the focus of our project. I usually have an introduction on the SmartBoard for the start of a new lesson. It has information about the artists, pictures, and goals for my students.

We will draw the flower starting in the center and build our way out layer by layer with the max. of 5 layers (4 layer min.). The layers will be drawn with various lines. This will incorporate math as each layer becomes part of a radial design. See example below:


Once outlined with Sharpie we will study color theory and pick colors to start coloring the flower. I encourage the students to try to pick different colors for each layer. **Start in center and move outward advoid mixing contrasting colors.

Watercolor paint will be used to fill in the negative space. If the student colored their flower with mostly warm colors then the watercolor will be with cool colors (vice versa) just so there is some sort of contrast there.


Wednesday, July 7, 2010

Pond Fish Painting


When I was student teaching I had the most amazing co-op teacher, Clare Torso. She was the most calm, creative, and innovative teacher I have ever met. This was one of the lessons I learned from her. It is intended for 1st graders.

Materials:
* Liquid Watercolor- Sax makes the best and you can make them last for a long time
* Diffusing paper
* 8.5x11 white paper for fish
* Construction paper for border
* Sharpies- HUGE fan with Sharpies! I use them for almost every project. Even with Kindergarteners.
* Watercolor Markers- Mr. Sketch makes the best markers, but they are expensive. I would highly suggest not getting the smelly ones. You'll spend half the class telling the kids not to shove them up their nose.
* Glue- Elmers glue for the cut out fish to be put on the diffusing paper. The diffusing paper is very thin, so it needs to be be glued onto a piece of construction paper so it's more sturdy. You must use a glue stick only to glue the diffusing paper onto the construction paper because the dye from the construction paper will dye the diffusing paper. A glue stick works great.
* Sprayer for water
* Book: The Rainbow Fish
* Matisse images of his paper cut outs

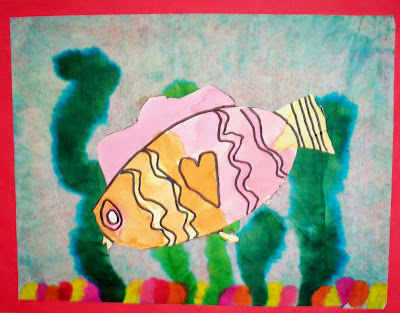
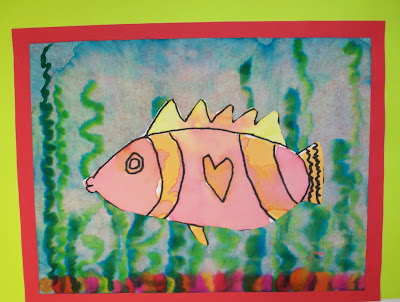
Once I read The Rainbow Fish to the students we will look at the basic shapes and parts of a fish and draw one on the 8.5x11 paper using an oval or circle. The inside of the fish is filled in with different types of lines and shapes. Outline with Sharpie and use watercolor paint (warm colors only since the water will be mainly cool) for the inside of the fish.

Now get the diffusing paper ready for the fish (will need 2 days). The first day is a super fast painting. Day 1: Use blue and green watercolor paint to completely cover the background- don't over mix. Let the diffusing paper do its job! Day 2: Add seaweed and colorful rocks to diffusing paper and spray with water to give a blurry look. Once dry, glue diffusing paper to construction paper.

Now you are ready to have the kids cut out their fish and glue onto the diffusing paper. I have had great results with this project and hope you will too!!

Tuesday, July 6, 2010

School Year 2010- 2011! Time For A Makeover!

As the new school year is quickly approaching, I have decided that my art room and the wall outside the art room needs a makeover before all those little artists come back. Thank goodness I have a friend, Julio, who has been wanting to gain experience in painting murals and agreed to do one at our school free of charge! Here are some pictures of what Julio has finished so far:


It looks great! I can't wait to see what the finished fish will look like!
As for my art room... I was getting sick of the institutional look. It needed some color, so I decided to go green! I still have to paint the top part, but not too bad for now.